March 11, 2022

A Painful Lesson About Need versus Want

After driving 51 miles every morning in rush hour traffic, I love relaxing while I sip coffee and do a puzzle from the Simon & Shuster Mega Crossword Puzzle Book.  When I do not know the name of a Greek God or other obscure facts, I look up the answer in the back of the book.  I have the satisfaction of doing a challenging puzzle while also finishing it.  Unfortunately, painful osteoporosis in my sound hand threatens my ability to drive a car one-handed.

Using paratransit to stay in my home would be difficult.  NJ paratransit can require riders to wait 40 minutes to be picked up and sometimes ride for an hour while other riders are delivered to their destinations.  It also has a two bag limit which requires multiple trips to the grocery store.  If I cannot find a way to make writing less painful, I will have to choose between something I love to do and driving which I need to do.  

Two adaptive devices that increase the diameter of a pen to discourage a tight grip did not work.  The hard plastic cylinder on the right has a tiny opening that does not accommodate my pens.  The soft tube on the left requires my painful hand to forcefully push the tube up onto the pen while I hold the pen in my mouth.  More pain is counter productive.  
My current strategy to make writing less painful has four parts.               1. Use double-sided tape to attach sticky Dycem to my pen.                         Increased friction means I do not have to grip as forcefully.              2.  Use a gel pen that allows ink to flow at a variety of angles.  
     Ball point pens are finicky about the angle you hold the pen.

3.  Put 2 or 3 fingers on top of the pen instead of the usual one.                     More fingers = less effort for each individual finger.                            4.  Keep all my fingers as straight as possible.  Bending my fingers               increases the pain. 

homeafterstroke.blogspot.com

March 3, 2022

Reviewing Adapted Knives

When I eat out I order soft food that can be cut with a fork, like fish and pasta.  At home I have rocker knives that let me press down on the food to hold it still while a rocking motion cuts the food.  The small knife on the left in the photo looks like an assassin's weapon so I use it at home to cut vegetables.  The long knife on the right is the most commonly used one.  The photo below shows that this rocker knife does not fit in my purse.
I use an across-the-body purse because straps slide off my shoulder. When I was able-bodied I had a free hand to keep pushing the strap back up.  I found a small purse called the Terrace Shoulder Pouch at ebag.com.  The long knife sticks up so people can see I am carrying a knife - not good.   

I love Verti-Grip Professional Knife from caregiverproducts.com.
It is held vertically so my whole arm can press down as I rock the blade side-to-side.  The rocker knives shown above are held horizontally so I can only create downwards pressure with my index finger. The Verti-Grip is only six inches long so it fits completely inside my purse.  The protective cover slides off easily so I put the knife in a small zip-lock bag to protect the inside of my purse.  The Verti-Grip costs $17.95 + S&H, but I think it is worth it.  homeafterstroke.blogspot.com

February 25, 2022

2nd Hardest Challenge to My Independence

Learning to drive a modified car is the hardest task I had to master after my stroke.  The 2nd hardest is dealing with the New Jersey ban on stores providing and selling disposable plastic bags.  Reusable bags sold in stores and on-line are big.  They hold a lot so they are too heavy for me to carry up my front steps.  They also do not nestle together in the rolling cart I use to transport bags from my car to my front door.  Section 1.18 of the law allows customers to use disposable bags so I reuse bags I have saved until they rip.  Going to a long-term facility because I cannot get food in my house is a severe consequence.  Meals-on-Wheels supplies only 2 meals a day Monday to Friday.

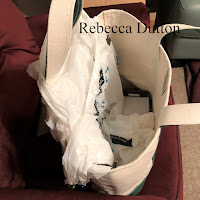
Solution # 1.  I carry my plastic bags in a canvas bag from LL Bean.  The small canvas bag was not tall enough to let the plastic bags hang down fully.  The large canvas bag sags.  The medium canvas bag with short handles is just right (see photo below).

Solution # 2.  I pre-bag a few items like a half gallon of milk and packages of meat that tend to leak.  I bring extra bags to shake open.      I place one handle over the metal arch shown in the photo.  Then I drop the item in the open bag.  This allows me to work at my own pace before I get to the check-out line.

Solution # 3.  When thin plastic bags are nested inside each other, the friction between bags makes several bags pull out at once.  Hanging them side-by-side vertically stops them from sticking together.  However, when I strung the handles of the plastic bags over the handles of the canvas bag it created a messy pile (see left handle).  I had trouble finding a handle that paired with its mate. 


So I weigh down one handle of each plastic bag with a big key ring.  I hang these key rings over the side of the canvas bag where they are easy to grab.  This strategy lets me quickly find one handle so I can pull the bag open, fill it, and lift it out of the canvas bag.


Solution # 4.  Bulky items like a box of cereal and a pack of toilet paper are hard to put in a small plastic bag.  I put a cereal box on the belt last so I can put it in the empty canvas bag which stays open because it is stiff.  For a pack of toilet paper, I make a hole in the top with my car key after I take it off the shelf.  I stick my finger in that hole to put the toilet paper on the belt and in my cart.

P.S.  I am grateful to a kind cashier at Shoprite named Michelle.  When no one was behind me in line Michelle waited patiently while I made numerous mistakes during multiple shopping trips.    The ban begins on May 4th.  I am glad I had all of February to find the solutions listed above.  Rehearsal saved me again.  homeafterstroke.blogspot.com

February 18, 2022

Joint Protection Principles Part 2

Avoid a Prolonged Grasp.  A phone with a head set means my painful sound hand does not have to hold a phone for an hour when I talk to family and friends.  


I have an Accto book holder.  Movable arms (see arrow) accommodate different size books.  A lever in the back adjusts the tilt.  I recently read for half an hour while holding a magazine.  Pain in my hand woke me the next morning before my alarm clock went off.


Lift with the Strongest Joint: I use my elbow to lift heavy objects like
cereal and milk containers.  My painful sound hand acts as a pivot to aim the container opening while my affected arm controls how far I lift the containers. homeafterstroke.blogspot.com

February 11, 2022

Joint Protection Principles Part 1

I am trying not to freak out because I have osteoarthritis from overusing my sound hand for 18 years.  Xrays confirm I have bone-on-bone contact which causes pain.  I cannot count on another disease killing me before my sound hand becomes useless.  So I am using the pain in my index and middle finger to tell me which joint protection strategies are helpful.  For example, when I put away a stack of clean cereal bowls, it hurts to lift a stack of 3 bowls but not 2.  My hope is that reducing pain means I am putting less stress on my joints which will make my hand useful longer.

Slide Rather Than Lift.  I used to fill up my kettle and then carry it to the stove.  Now I put in water for only 1-2 coffee cups and slide it on a dishrag from the sink to the stove.  No pain.


I use my kitchen cart to roll clean dishes from my dishwasher to the cabinets.  This means I do not have to make multiple trips to carry all these heavy objects to put them away.  I lift dishes from waist height to only the 1st cabinet shelf.  No pain.   


Avoid Repeated Gripping.  I cannot stand to watch the same commercials 4 times every hour for months so I constantly change the TV channels with my remote control.  My remote is not heavy, but my painful thumb and middle finger have to hold it tightly because it wobbles as my painful index finger pushes a button. 


Now I place the remote on my palm while my sound hand rests on my couch. When my thumb reaches over to press a button, my palm presses the remote against my thigh which holds it still. No pain.  homeafterstroke.blogspot.com

February 3, 2022

My Final Insomnia Solution

I hope I have found my final insomnia solution.  I bought a child size weighted blanket.  I was afraid I would not be able to handle an adult size blanket one-handed.  The small size means it covers me only from the waist down.  I do not think I would be comfortable having that extra weight on my chest.  Bottomline: I occasionally wake up at 3:30 A.M., but I sleep 6 to 8 hours most nights.  A friend also ordered a child size weighted blanket and reported the same results.  The calming effect of the extra weight is not just hype.

January 24, 2022

Goal Oriented Rehab

A study found people in rehab improved more when they worked on goals that were meaningful (1).  There are three kinds of OT goals, but you often see only two of them during an OT session.

1. The Preparation
OTs see many clients who need 100's of repetitions to rewire the brain and rebuild the body.  Examples include opening the hand with help from of a spring-loaded splint and scanning to the left for visual neglect.   

2. The I Shoulds
Many people have the same shoulds.  We all should get dressed so we can visit with others, do laundry so we have clean clothes, write legibly so we can sign credit card slips, and have good memory strategies so we get to appointments on time.  The photo shows my affected hand opening to hold the lint trap.


3. The I Want Tos
"I want to" is something personal that makes a client's face light up - like cuddling with a beloved cat without getting your bare thighs scratched.  Many valued activities do not take place during therapy because they require special equipment or environments.  OTs must link "I should" to        "I want to" so clients can understand what OT is trying to accomplish.  A linking statement might be "don a bra so you will not be embarrassed when you eat lunch with friends."  I live alone so donning my bra enhances my social life.  Or if a homebound client wants to feel the sun on his or her face, an OT can point to pictures or say "leg brace - patio."  homeafterstroke.blogspot.com

1. Lenze ER, et al.  Effect of enhanced medical rehabilitation on functional recovery in older adults
    receiving skilled nursing post-acute rehabilitation.  JAMA Network Open (in press).

January 15, 2022

Relacing Shoes One-handed

Yesterday's post about tying shoes one-handed means I did not have to push a wheelchair across carpeting with one hand and one foot when I got home.  The door jambs in my house also do not have gouges because it is hard to keep a wheelchair going straight when you do not have 2 hands.

Relace the Shoe: There can be only one free end at the top when you tie shoe laces one-handed.  I have the lace come out of the top hole on the same side as my affected foot.  This dictates which bottom hole I lace through first.    

Adjust Length of the Lace: I wear a leg brace so I need the full length of the shoe lace on my affected foot.  However, the shoe on my sound foot closes more tightly so I cut off 3 inches before I relace the shoe.  Trimming the bottom means I do not have excess lace at the top of this shoe.

Make an Anchor Knot: I put the lace through the bottom hole, leaving a 6 to 8 inch tail hanging out of the hole.  The "tail" gives me something to wrap around my affected hand so I can hold the lace while my sound hand makes a double knot.  I place one knot on top of each other rather than two side-by-side knots like pearls on a necklace.  A scout leader told me this sailing knot holds against great pressure.  Sometimes I leave the plastic aglet at the end of the lace and sometimes I cut it off which creates a tiny fuzzy pom-pom.  Both tuck out of sight (see bottom hole in photo above).  homeafterstroke.blogspot.com.

January 14, 2022

Tying Shoe Laces One-handed

It broke my heart when I saw a photo of the big toe nail Dean lost because loose Velcro fastenings allowed his feet to slide in his shoes.  I do not want sliding motions when I walk because my hips already hurt from time to time.  I am glad I can tie my shoelaces tightly with one hand (1).        Staying out of a wheelchair is definitely worth the effort.  

Tighten the Lace: If the holes in your shoes are punched through the leather, friction holds the lace in place after you pull on it and let go.  

The lower part of my shoe has D-rings (see bottom of arrow).  At the topmost D-ring I pull the lace tight and then maintain the tension by pressing down with my little finger.  Then I use my thumb and index finger to pull the slack (arched part of lace) through the next hole.        I pull the lace tight in the remaining top holes.


Make a Half Loop:  First my last 3 fingers grab the free end of the lace.  Then I slip my index under the top horizontal lace so my index finger is pointing back at my body.  This allows me to drag the lace under the horizontal lace to create the loop seen in the next photo.
Tighten Lace at Top Hole: The top horizontal lace is loose because my finger was under it so I pull to tighten it (see arrow).  Then I make the messy looking loop neater like in the photo.


Make a Slip Knot: My hand looks fisted while I grab the free end of the lace with my last 3 fingers.          I use my thumb to push the lace through the 1st loop (see arrow) that I created in the photo above.  This creates a 2nd loop.  I pull my thumb free and vigorously yank the loop sitting on the index card from side-to-side to tighten it.  


See tomorrow's post for how I relace my shoes so there is only one free end at the top.  homeafterstroke.blogspot.com
1. Dutton.R.  My Last Degree: A Therapist Goes Home After a Stroke, 2nd ed. Booklocker; 2013. 

January 4, 2022

Do Not Throw Away Your Bananas

Part of my healthy diet is putting a banana on my cereal instead of sugar.  But there is no "honey do" at my house so to cut down on trips to the store I buy a bunch of bananas.  I live alone so a bunch of bananas turns brown and becomes mushy before I can eat them all.  

To get the bananas off my kitchen counter, I separated them and put them in a container in my refrigerator.              I discovered when I put green bananas in the refrigerator, the peels turn brown but the bananas do not.  

The trick is remembering to put a banana on the counter    1 or 2 days before I want to eat it so it will ripen.            Green bananas are difficult to peel.  homeafterstroke.blogspot.com